


Flat Roof Installation Over Tar and Gravel - Most Effective Recover Roofing System
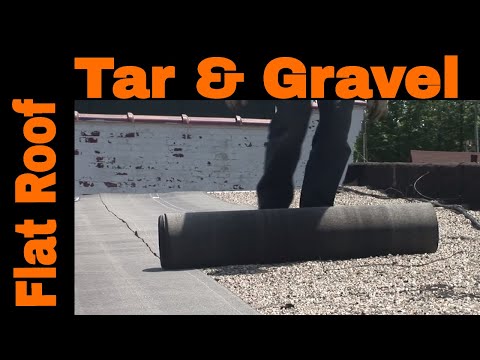
Installing a new flat roof over an existing tar and gravel surface is one of the smartest, most cost-effective roofing decisions a homeowner or contractor can make. Instead of a costly and time-consuming full tear-off, a recover system adds a fresh, watertight membrane directly over the old roof — saving time, labor, and money while delivering long-lasting results.
Why Recover Instead of Tear Off?
A full flat roof tear-off can be expensive and disruptive. In many cases, recovering over an existing tar and gravel roof is the better option:
- Significantly lower labor and disposal costs
- Adds an additional layer of insulation and weather protection
- Reduces project timeline from days to hours
- Less mess and disruption to the building below
- Still achieves a fully watertight, code-compliant result
Step 1: Surface Preparation
Before any new roofing material is applied, proper surface prep is critical. A poorly prepared surface will cause the new system to fail prematurely.
Prep Checklist
- 🔍 Inspect the existing tar and gravel surface for soft spots, blisters, and ponding water areas
- 🧹 Sweep the roof clean of all loose gravel, debris, and dirt
- 🔧 Repair any damaged or deteriorated areas before proceeding
- 📐 Check and correct the roof slope to ensure proper drainage
- 🌧️ Confirm the roof deck is structurally sound and can support the additional weight
- ✂️ Trim or remove old flashing that may interfere with the new system
Step 2: Choosing the Right Recover System
There are three primary membrane options for recovering over tar and gravel flat roofs. Each has its own strengths depending on climate, budget, and building use:
TPO (Thermoplastic Polyolefin)
- ✅ Highly reflective white surface — reduces cooling costs
- ✅ Heat-welded seams for a strong, waterproof bond
- ✅ Lightweight and flexible
- ✅ One of the most popular choices for commercial and residential flat roofs
- 💰 Mid-range cost
EPDM (Rubber Roofing)
- ✅ Extremely durable — lifespan of 25–30+ years
- ✅ Excellent resistance to UV, ozone, and extreme temperatures
- ✅ Easy to repair with patch kits
- ⚠️ Black surface absorbs heat (white-coated versions available)
- 💰 Budget-friendly option
Modified Bitumen
- ✅ Excellent waterproofing performance in cold climates
- ✅ Torch-applied or self-adhering installation options
- ✅ Multi-layer system provides added protection
- ⚠️ Torch application requires a certified installer
- 💰 Higher cost but very long-lasting
Step 3: Installing the New Membrane
Once the surface is prepped and the membrane is selected, installation begins. The process varies by membrane type but generally follows these steps:
- Roll out the membrane across the roof in consistent, overlapping strips
- Mechanically fasten or adhere the membrane to the existing surface based on the system specifications
- Weld or seal all seams — this is the most critical step for waterproofing
- Work from the low point upward to ensure proper overlap direction with water flow
- Allow proper cure time before walking on the finished surface
Step 4: Flashing Details
Flashing is where most flat roof failures occur. Getting these details right is essential for a long-lasting installation:
Critical Flashing Areas
- 🔧 Roof edges and perimeters: Install metal edge trim and seal the membrane termination bar
- 🔧 Drains and scuppers: Cut the membrane around drains and use drain collars for a watertight seal
- 🔧 Pipe penetrations: Use pre-formed pipe boots or fabricate custom flashing boots
- 🔧 HVAC curbs: Flash up the sides of all rooftop units a minimum of 8 inches
- 🔧 Parapet walls: Extend membrane up and over wall caps where applicable
Step 5: Final Inspection
Before calling the job complete, run through a thorough final inspection:
- Walk the entire roof and check every seam for proper welding or adhesion
- Test all drains by pouring water and watching for proper flow
- Inspect all flashing terminations for gaps or lifted edges
- Check that the membrane is secured at all perimeters
- Look for any punctures, bubbles, or areas of improper adhesion
- Document the installation with photos for warranty and insurance purposes
How Long Will a Recover Roof Last?
When properly installed, a flat roof recover system offers excellent longevity:
Expected Lifespan by System
- 🏠 TPO: 15–25 years with proper maintenance
- 🏠 EPDM: 25–30+ years — one of the longest-lasting options
- 🏠 Modified Bitumen: 20–30 years depending on layers and climate
Final Thoughts
A flat roof recover installation over tar and gravel is a proven, cost-effective solution that delivers professional-grade results without the cost and disruption of a full tear-off. With the right surface prep, a quality membrane system, and careful attention to flashing details, your recover roof can protect your building for decades to come.
See the Full Installation in Action
Watch the complete step-by-step flat roof recover installation video to see exactly how each phase is executed — from surface prep all the way to the final inspection. Whether you're a DIYer or a roofing professional, this video is packed with practical techniques and tips you can put to work immediately.